Installation Tutorial for Oracle Cloud
Oracle Cloud provides a generous free tier that is well-suited to running QuantRocket. The free tier provides 4 CPUs, 24 GB of memory, and 200 GB of storage on an Ampere A1 instance, which uses ARM-based processors. Learn more about Oracle Cloud's free tier.
Create Oracle Cloud Account
Start by signing up for an Oracle Cloud account.
When prompted, choose to create an individual account, not a corporate account, even if you're a professional trading firm. Corporate accounts are intended for large enterprise customers whose cloud spending with Oracle exceeds several thousand dollars per month. In the next step, you will upgrade to Pay As You Go billing, which can only be done for individual accounts.
You will be asked to choose a cloud account name, which you will use during login. This could be an individual username (e.g. johnsmith23) or a company name (e.g. abccapital).
Upgrade to Pay As You Go
At this point, your account is classified as a Free Tier account. You can attempt to launch a free Ampere A1 instance using the steps outlined in the next section. However, you will likely receive an "Out of Capacity" error message due to free tier demand exceeding capacity. To resolve this, you should upgrade your account to Pay As You Go billing, which provides access to a larger pool of Always Free resources. (Upgrading to Pay As You Go billing does not incur any charges unless you exceed the Always Free limits.)
Upgrading to Pay As You Go billing is not an instantaneous process. You may have to wait a day or two for the upgrade to complete. Here's how to upgrade:
- Sign in to the Oracle Cloud Console
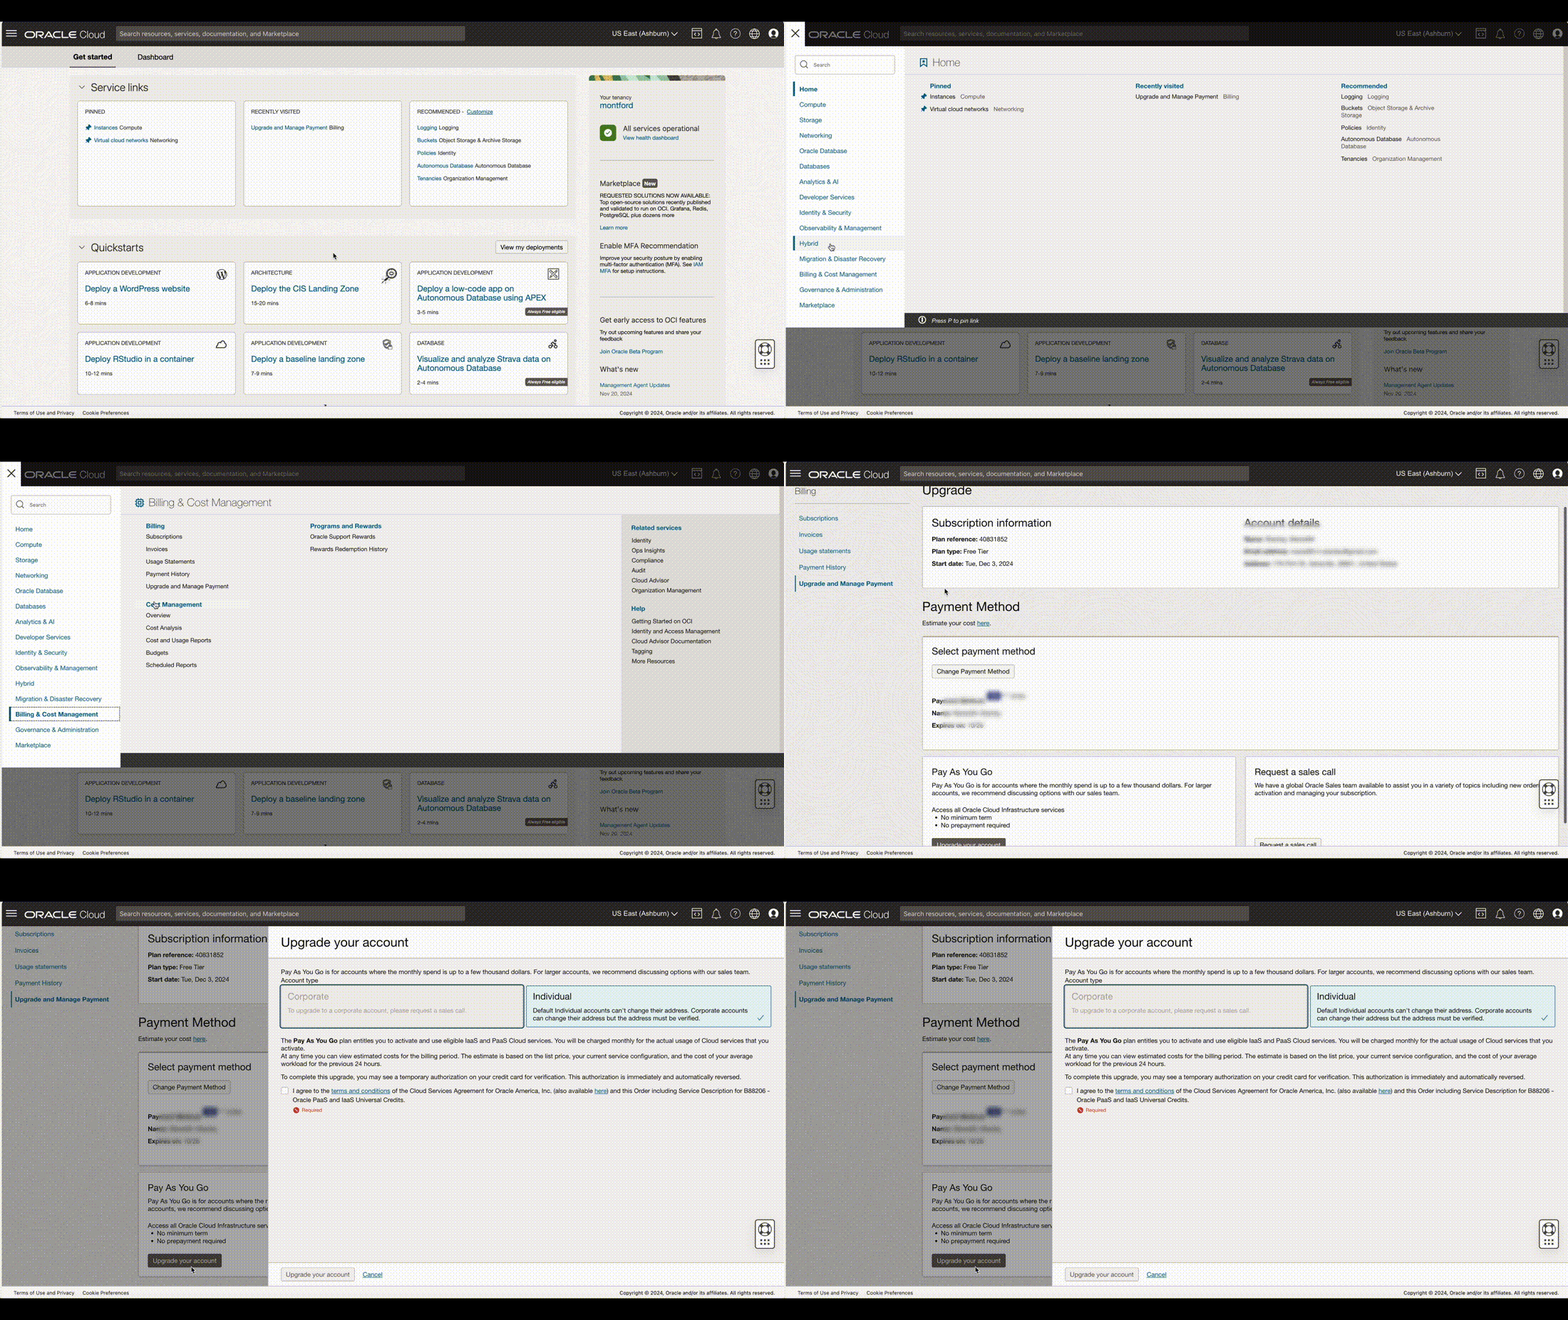
- Open the navigation menu (hamburger icon) and click Billing and Cost Management > Upgrade and Manage Payment.
- On the Manage Payment page, under Pay As You Go, click Upgrade your account.
- In the modal window, select Individual account, agree to the terms, then click Upgrade your account.

The upgrade process may take a day or two. You will receive an email when the upgrade is complete. Once the upgrade is complete, you should be able to launch an Ampere A1 instance without experiencing an "Out of Capacity" error.
Create an Ampere A1 Instance
Follow these steps to create an Always Free-eligible Ampere A1 instance with 4 CPUs, 24 GB of memory, and 200 GB of storage. First, sign in to the Oracle Cloud Console and create a new instance as follows:
- In the Oracle Cloud Console, open the navigation menu (hamburger icon) and click Compute > Instances
- Instances must be created within a "compartment", which is Oracle's term for a group of resources. On the Instances page, in the left sidebar, choose the Compartment corresponding to the cloud account name you chose when creating your account. This is your "root" compartment.
- Click Create Instance. This will open the instance configuration page.
On the instance configuration page, configure the instance as described below. Configuration details which are not mentioned below can be left with their default settings.
- Name: give your instance a name such as "quantrocket"
- Image and Shape:
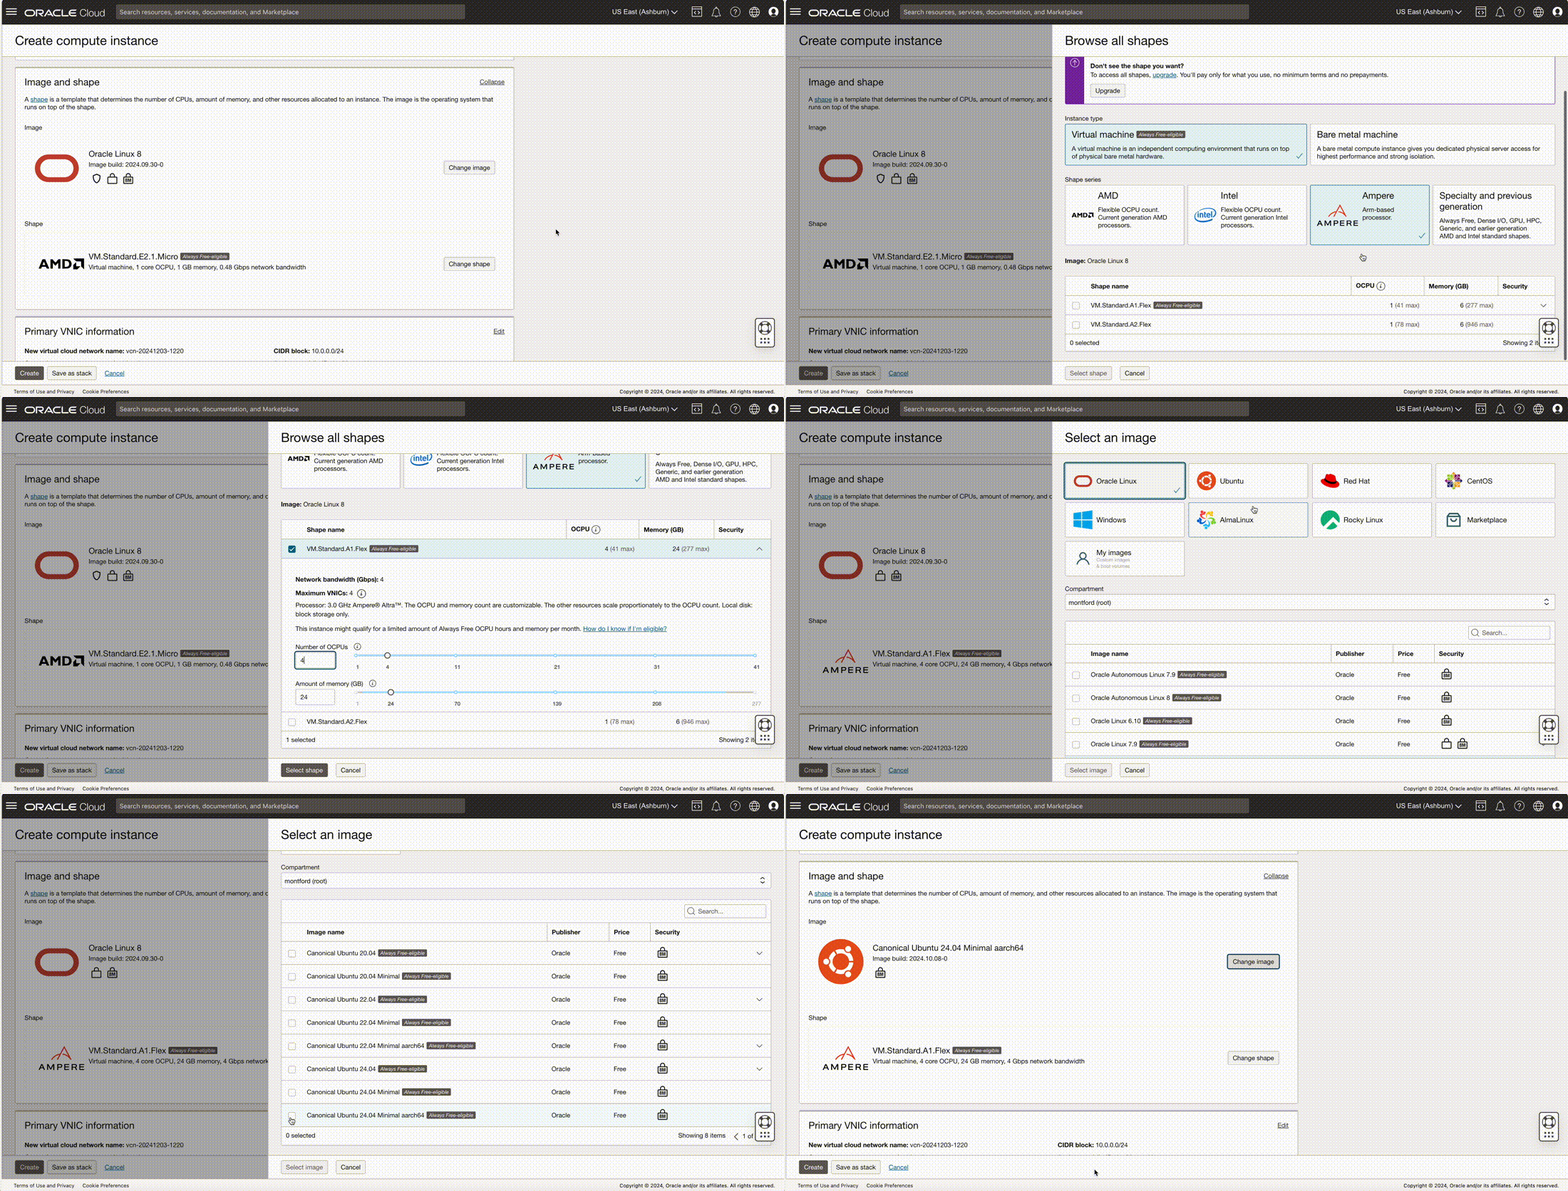
- Image: choose Ubuntu and select the latest version of Ubuntu Minimal aarch64
- Shape: click Ampere, then select V1.standard.A1.Flex (Always Free-eligible). In the sliders, set the OCPUs to 4 and the memory to 24GB.

- Primary VNIC information:
- Primary network: choose "Create a new virtual cloud network". In the "New virtual cloud network name" field, enter a name such as "vcn-quantrocket".
- Subnet: choose "Create a new public subnet". In the "New subnet name" field, enter a name such as "subnet-quantrocket".
- Note: These steps only need to be completed the first time you launch an instance. In the future, when launching an instance, choose the existing virtual cloud network and subnet you previously created.
- Add SSH keys: choose "Upload public key files" and upload your public SSH key (not your private key). If you don't have an SSH key pair, you can generate one with
ssh-keygenon your local machine. (The console provides a link to Oracle's documentation for generating an SSH key pair.) - Boot Volume: check the box to "Specify a custom boot volume size" and set the size to 200GB.
- Click Create.
The Instance information page will open, and Oracle will begin creating the instance.
Open Ports
Next, you must open ports 80 and 443 to allow access to your instance.
Port 443
Opening port 443 (HTTPS) allows you to access QuantRocket's JupyterLab dashboard securely through your browser. Follow these steps to open port 443:
- In the Oracle Cloud Console, navigate to the instance you created if you're not already there. (Open the navigation menu, click Compute > Instances, then click the instance name.)
- On the Instance information page, locate the Primary VNIC section. Click the subnet link (e.g. "subnet-quantrocket"). This takes you to the subnet details page.
- Under Security Lists, click the default security list.
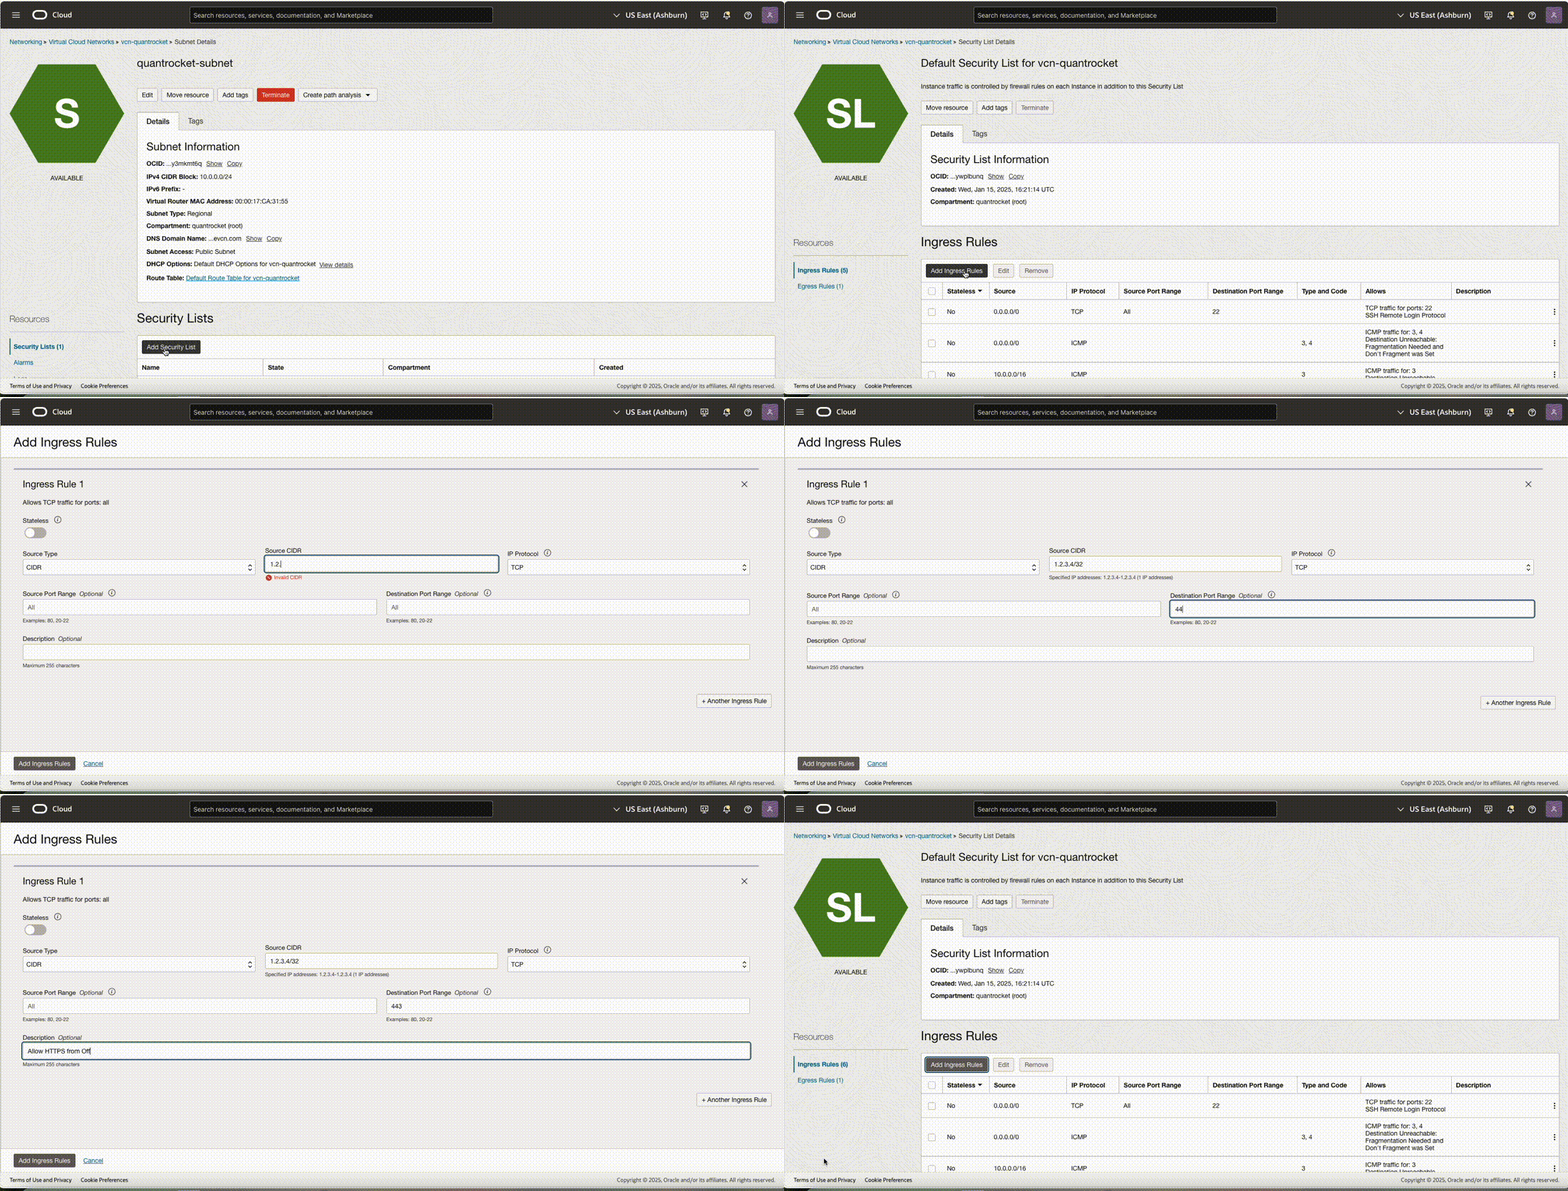
- Under Ingress Rules, click Add Ingress Rules.
- Configure the rule as follows:
- Source Type: set to CIDR.
- Source CIDR: Set this field based on the IP address from which you will access QuantRocket. The value you enter should be in the format
x.x.x.x/32, wherex.x.x.xis your IP address. (If you don't know your IP address, you can find it by searching "what is my IP address" in a search engine.) - Protocol: TCP
- Destination Port Range: set to 443.
- Description: add a description to help you remember the rule's purpose later. For example, "Allow HTTPS access from the office".
- Click Add Ingress Rules to save the rule.

We recommend only opening port 443 to traffic from the specific IP address(es) from which you will access QuantRocket, as shown above. To access QuantRocket from multiple locations, add ingress rules for each location. QuantRocket cloud deployments use Basic Authentication (covered later in the tutorial) to prevent unwarranted access, but whitelisting trusted IP address(es) (instead of allowing all IP addresses) is an additional best practice. Basic Authentication can be compared to a lock on a door: unauthorized users can't open the door without the password, but they can still knock on the door (make requests to the server). Restricting traffic to trusted IP addresses prevents unauthorized users from making requests to your server at all. This is advantageous because it reduces the server's workload.
Port 80
Port 80 is used to provision and periodically renew an SSL certificate for your deployment. SSL certificates are issued by Let's Encrypt, which makes a request to your deployment on port 80 during provisioning and renewal to verify domain ownership. Because the IP address from which Let's Encrypt verification originates can change, port 80 must be open to all IP addresses. This doesn't present a security risk because no service listens on port 80 except during Let's Encrypt verification. QuantRocket itself is not accessible through port 80.
To open port 80:
- Click Add Ingress Rules.
- Configure the rule as follows:
- Source Type: set to CIDR.
- Source CIDR: set to
0.0.0.0/0. (This means all IP addresses.) - Protocol: TCP
- Destination Port Range: set to 80.
- Description: add a description such as, "Allow port 80 from anywhere".
- Click Add Ingress Rules to save the rule.
Install Docker
The next step is to install Docker on your cloud instance.
In the Oracle Cloud Console, navigate to the instance and copy the public IP address. Then open PowerShell (Windows) or Terminal (Mac/Linux) on your local computer and SSH into the instance, using the username ubuntu and the public IP address.
$ ssh ubuntu@x.x.x.xFollow these steps to install Docker (steps adapted from https://docs.docker.com/engine/install/ubuntu/). First, uninstall any old versions of Docker (ignore any error messages stating that the packages aren't located):
for pkg in docker.io docker-doc docker-compose docker-compose-v2 podman-docker containerd runc; do sudo apt-get remove $pkg; doneThen, set up Docker's apt repository:
# Add Docker's official GPG key:
sudo apt-get update
sudo apt-get install ca-certificates curl
sudo install -m 0755 -d /etc/apt/keyrings
sudo curl -fsSL https://download.docker.com/linux/ubuntu/gpg -o /etc/apt/keyrings/docker.asc
sudo chmod a+r /etc/apt/keyrings/docker.asc

# Add the repository to Apt sources:
echo \
  "deb [arch=$(dpkg --print-architecture) signed-by=/etc/apt/keyrings/docker.asc] https://download.docker.com/linux/ubuntu \
  $(. /etc/os-release && echo "${UBUNTU_CODENAME:-$VERSION_CODENAME}") stable" | \
  sudo tee /etc/apt/sources.list.d/docker.list > /dev/null
sudo apt-get update
Finally, install Docker:
sudo apt-get install docker-ce docker-ce-cli containerd.io docker-buildx-plugin docker-compose-pluginVerify the installation by running the hello-world image:
sudo docker run hello-worldNext, run the following command to enable Docker to run without sudo:
sudo usermod -aG docker $USERFor this change to take effect, reboot the instance:
sudo rebootYou will be exited from the instance. Wait a few minutes for the instance to reboot, then SSH back in and verify that you can run Docker commands without sudo:
$ ssh ubuntu@x.x.x.x

docker run hello-world
Then exit the SSH session:
exitPer Docker's SSH tips, it's a good idea to add the following lines to your ~/.ssh/config file on your local computer to allow Docker to reuse SSH connections:
ControlMaster     auto
ControlPath       ~/.ssh/control-%C
ControlPersist    yes
Setup Domain
Cloud deployments must be accessed via a domain you provide (for example quantrocket.abccapital.com); they cannot be accessed via the IP address of the cloud server. During the deployment process, QuantRocket will obtain an SSL certificate from Let's Encrypt so that you can securely access your cloud deployment over HTTPS. You must provide your own custom domain to use for the SSL certificate.
Log in to your DNS provider and create an A record that points your custom domain to the IP of your cloud server. For example, if the IP address is 1.2.3.4 and your domain is abccapital.com, you could create an A record that points quantrocket.abccapital.com to IP address 1.2.3.4.
In a subsequent step, you will provide your custom domain (quantrocket.abccapital.com) as the environment variable HOUSTON_DOMAIN. QuantRocket will use this to obtain a SSL certificate from Let's Encrypt for your custom domain.
After you setup your domain, make sure you can access your cloud server via SSH using the domain name:
$ ssh ubuntu@quantrocket.abccapital.comInstall Docker Locally
Next, you must install Docker on your local computer if it isn't already installed. This will allow you to type Docker commands on your local computer but have those commands run on your cloud server.
Follow the instructions to install Docker Desktop for your operating system.
Download Docker Compose file
To install QuantRocket, download a Docker Compose file from QuantRocket's website. A Compose file is a YAML file that tells Docker how to create the QuantRocket stack.
Open a command line prompt (PowerShell on Windows, Terminal on Mac/Linux).
Create a folder for QuantRocket under your home directory:
$ cd ~
$ mkdir quantrocket-cloud
$ cd quantrocket-cloudquantrocket folder for a local deployment of QuantRocket, create a different directory for the cloud deployment, for example quantrocket-cloud as shown in this tutorial.Copy and paste the following command to download the latest Compose file and save to your computer:
$ curl 'https://www.quantrocket.com/composefiles/latest/cloud/docker-compose.yml' -o docker-compose.yml(You can also download the Compose file from the downloads page.)
Set cloud environment variables
To deploy QuantRocket to the cloud, you must set several environment variables which define the domain and authentication credentials to use for your cloud deployment.
In your Compose file, you'll see a section like the following:
houston:
  image: 'quantrocket/houston:2.11.0'
  environment:
    BASIC_AUTH_USER: '${HOUSTON_USERNAME}'
    BASIC_AUTH_PASSWD: '${HOUSTON_PASSWORD}'
    LETSENCRYPT_DOMAIN: '${HOUSTON_DOMAIN}'
This tells Docker to look for environment variables called HOUSTON_USERNAME, HOUSTON_PASSWORD and HOUSTON_DOMAIN on your computer and pass them to the houston container, QuantRocket's API gateway.
These environment variables serve the following purpose:
${HOUSTON_USERNAME}/${HOUSTON_PASSWORD}: username and password which you'll use to connect remotely to your deployment (you can set these to anything you want)${HOUSTON_DOMAIN}: the custom domain from an earlier step (for examplequantrocket.abccapital.com)
To set the environment variables, follow the instructions appropriate to the operating system of your local computer (not the OS of the cloud server).
In PowerShell, set the environment variables using the following syntax:
$ [Environment]::SetEnvironmentVariable("HOUSTON_USERNAME", "whateveryouwant", "User")
$ [Environment]::SetEnvironmentVariable("HOUSTON_PASSWORD", "pickastrongpassword", "User")
$ [Environment]::SetEnvironmentVariable("HOUSTON_DOMAIN", "quantrocket.abccapital.com", "User")On Mac, set your environment variables in ~/.zshenv, which gets executed each time you open Terminal.
$ touch ~/.zshenv
$ echo 'export HOUSTON_USERNAME=whateveryouwant' >> ~/.zshenv
$ echo 'export HOUSTON_PASSWORD=pickastrongpassword' >> ~/.zshenv
$ echo 'export HOUSTON_DOMAIN=quantrocket.abccapital.com' >> ~/.zshenv
Source the file to make the environment variables available in the current terminal session (not required for future terminal sessions):
$ source ~/.zshenvOn Linux, set your environment variables in ~/.bashrc, which gets executed each time you open a terminal. (Adapt these commands if you use a shell other than bash.)
$ touch ~/.bashrc
$ echo 'export HOUSTON_USERNAME=whateveryouwant' >> ~/.bashrc
$ echo 'export HOUSTON_PASSWORD=pickastrongpassword' >> ~/.bashrc
$ echo 'export HOUSTON_DOMAIN=quantrocket.abccapital.com' >> ~/.bashrc
Source the file to make the environment variables available in the current terminal session (not required for future terminal sessions):
$ source ~/.bashrcSetup Docker Context
By default, any docker or docker compose commands you type on your local computer will run locally. However, you can send those commands to your cloud server instead by defining a Docker Context that points to your cloud server. Supply a name for the context (cloud in this example) and specify the SSH connection parameters using the following syntax, substituting your domain or IP address (domain names and IP addresses are both supported):
$ docker context create cloud --docker "host=ssh://ubuntu@your_domain_or_ip"There are two ways to activate the cloud context you created. The first option is to explicitly specify the --context parameter each time you run a docker or docker compose command. For example:
$ docker --context cloud compose up -dIf you are running multiple QuantRocket deployments (such as one locally and one in the cloud), this explicit approach may be best to avoid confusion about which deployment you are targeting.
Alternatively, you can set the context persistently using docker context use <context_name>:
$ docker context use cloudAny subsequent docker or docker compose commands will run against your cloud server, without the need for the --context parameter. If needed, you can switch back to the local Docker deployment by activating the specially named 'default' (that is, local) context:
$ docker context use defaultDeploy QuantRocket
Now you can use docker compose to deploy QuantRocket to the cloud server:
$ cd ~/quantrocket-cloud
$ docker --context cloud compose up -d
Docker Compose will read your docker-compose.yml, pull the images down from Docker Hub onto your cloud server, and create and run containers from the images. This process takes several minutes. You will see output like this:
⠸ flightlog Pulling
⠸ codeload [⣿] Pulling
⠸ satellite [⣿⣿⣿⣿⣿⣿⣿⣿⣿⣿⣿⣿⣿⣿⣿⣿⣿⣿⣿⣿⣿⣿⠀] Pulling
⠸ moonshot [⣿] Pulling
⠸ license-service [⣿] Pulling
⠸ account Pulling
⠸ countdown [⣿] Pulling
⠸ dash [⣿] Pulling
⠸ blotter [⣿] Pulling
⠸ ibg1 Pulling
⠸ zipline Pulling
⠸ ibgrouter Pulling
⠸ jupyter Pulling
⠸ db [⣿⣿⣿⣿] Pulling
⠸ master [⣿] Pulling
⠸ fundamental [⣿⣿⣿⣿⣿] PullingConnectTimeout or Connection reset by peer, retry with the following command, which tells Docker Compose not to try pulling multiple images in parallel: docker --context cloud compose --parallel=1 up -dYou can list all the containers that are running on your deployment:
$ docker --context cloud psCONTAINER ID IMAGE COMMAND CREATED STATUS PORTS NAMES
d26da467ac03 bc77b14f9c3d "uwsgi-quantrocket -…" About an hour ago Up About an hour 80/tcp quantrocket-master-1
b1569b403b38 f2226cb5f6c3 "uwsgi-quantrocket -…" About an hour ago Up About an hour 80/tcp quantrocket-fundamental-1
fcf1c7b0fb36 1ca2dbd9bfd2 "uwsgi-quantrocket -…" About an hour ago Up About an hour 80/tcp quantrocket-realtime-1
952089561d20 fcade8902208 "uwsgi-quantrocket -…" About an hour ago Up About an hour 80/tcp quantrocket-history-1
...You should now be able to access the Jupyter environment in your browser at your custom domain. For example, if your custom domain is quantrocket.abccapital.com, your deployment URL is https://quantrocket.abccapital.com. You may want to bookmark this URL.
Your browser will prompt you to enter the username and password you set earlier (and should store the credentials so you don't have to re-enter them each time).
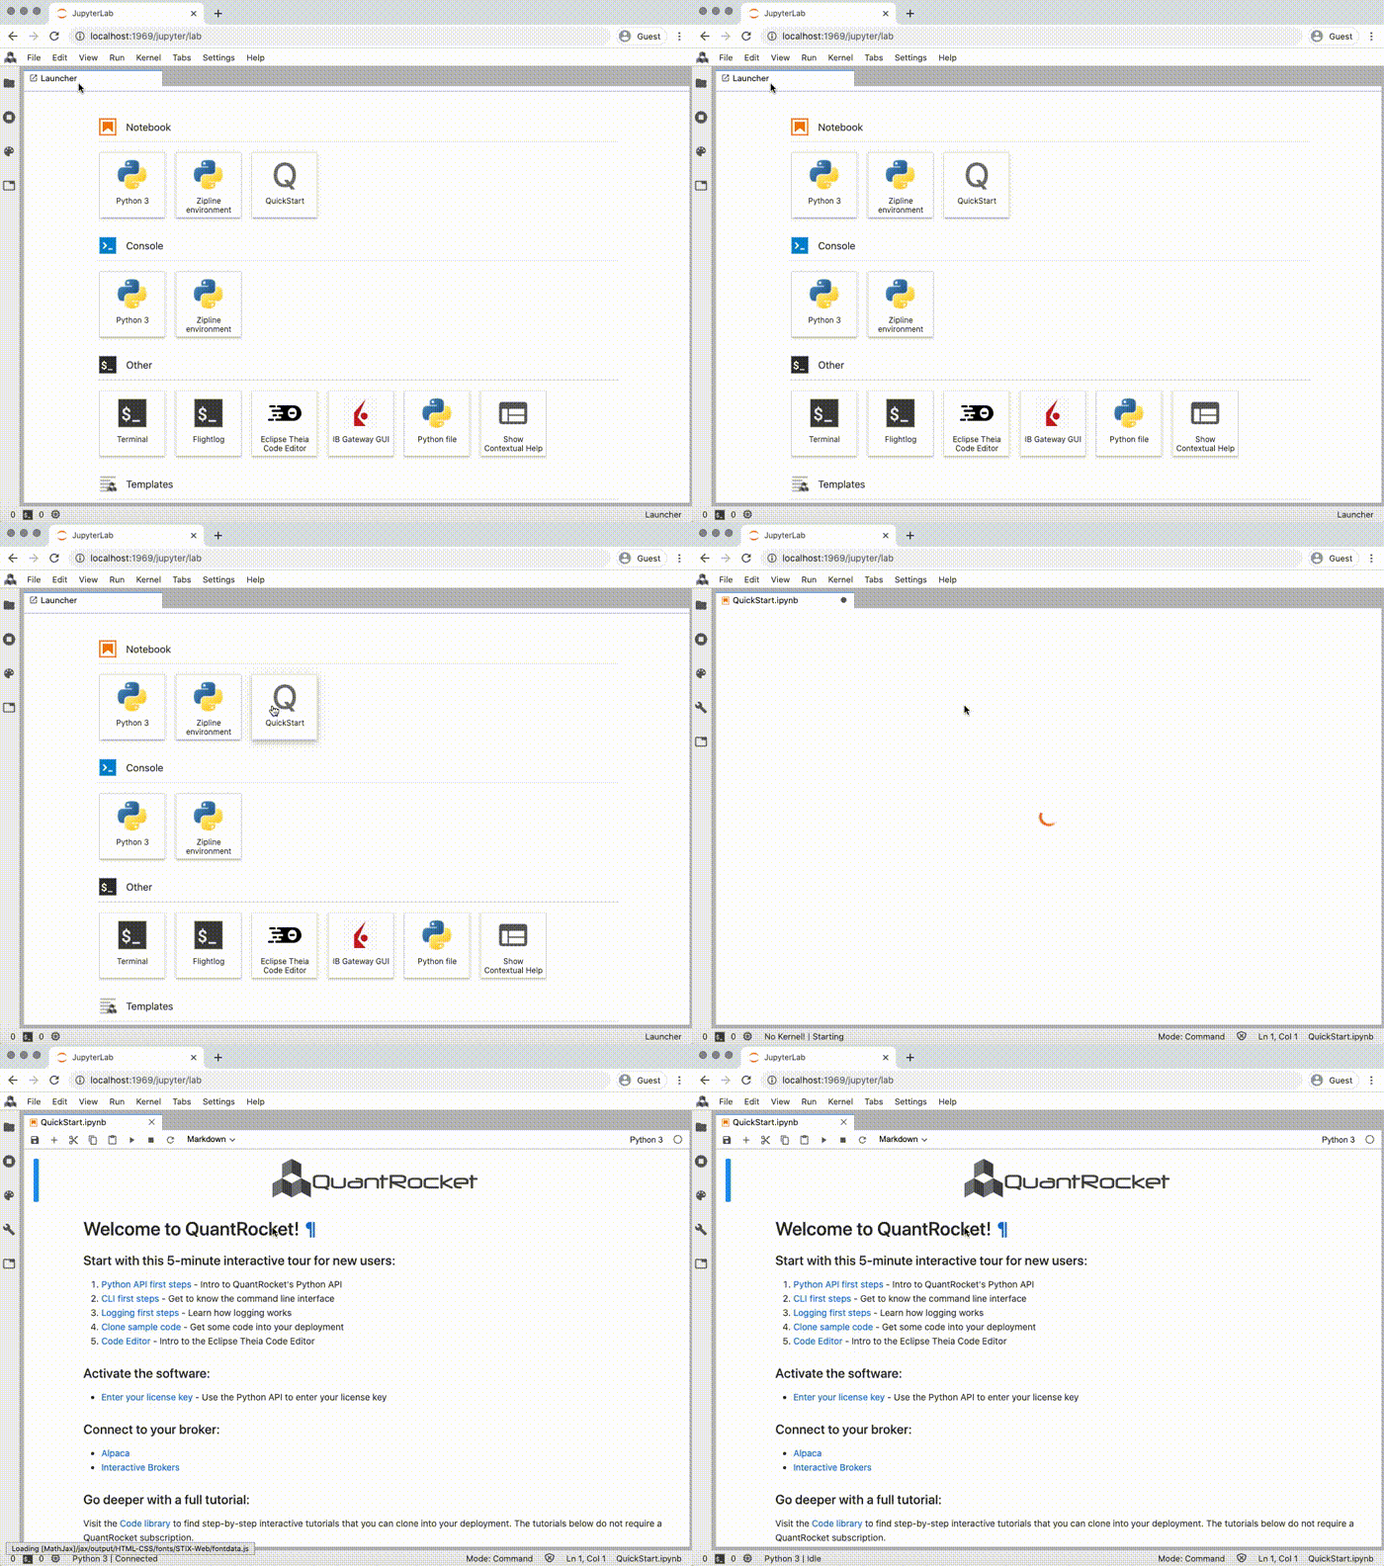
docker --context cloud compose logs houstonIn JupyterLab you'll see the JupyterLab dashboard. Click the Quickstart button to find an interactive tour and other resources to help you get started with QuantRocket:

 Send a Message